Software Requirements.
-Java SE Development Kit 6
-JBoss 4.2.2 GA
-MySQL Server 5.0
-MySQL Administrator
-MySQL Connector/J
-Web browser with Java Plug-in 1.4.0 or higher
1. Install Java
-Go to http://java.sun.com/javase/downloads
-Download and install the "Java SE Development Kit 6" (JDK 6).
For specific instructions on how to install the Java SE Development Kit 6 go to http://java.sun.com/javase/6/webnotes/install/index.html
2. Install MySql
-Go to http://dev.mysql.com/downloads
-Download and install "MySQL 5.0"
-Download and install "MySQL GUI Tools"
-Also download "MySQL Connector/J 5.0" and extract the archive "mysql-connector-java-5.0.4-bin.jar" this will be later deployed into JBoss.
For more detailed information about MySQL 5.0 go to http://dev.mysql.com/doc/refman/5.0/en/index.html
3. Install JBoss
-Go to http://labs.jboss.com/jbossas/downloads
-Click "Download" for the 4.2.2 GA version.
-Download the file "jboss-4.2.2.GA.zip"
-To install JBoss just unzip "jboss-4.2.2.GA.zip"
For more detailed information about JBoss go to http://labs.jboss.com/portal/jbossas/docs (registration required)
4. Download Overactive Logistics
-Go to http://sourceforge.net/projects/overactive
-Download the distribution "overactive-logistics-pre-alpha1.5"
5. Generate the Overactive Logistics Database
-Extract from the "overactive-logistics-pre-alpha1.5.zip" the "logistics.sql" file.
-Run MySQL Administrator
-Select Catalogs and create a new schema called LOGISTICS
-Select Restore and open the "logistics.sql" back up file.
-Select the Target Schema LOGISTICS
-Start Restore
6. Deploy the Datasource
-Extract from the "overactive-logistics-pre-alpha1.5.zip" the "mysql-ds.xml" file.
-Open the "mysql-ds.xml" file.
-Provide the username and password for the database where indicated. These could be the ones used to log on to "MySQL Administrator"

7. Deploy the Database Driver
-Copy the "mysql-connector-java-5.0.4-bin.jar" into the "deploy" folder in your JBoss installation.
8. Deploy Overactive Logistics
-Extract from the "overactive-logistics-pre-alpha1.4.zip" the "overactive-logistics.ear" file.
-Copy the "overactive-logistics.ear" into the "deploy" folder in your JBoss installation.
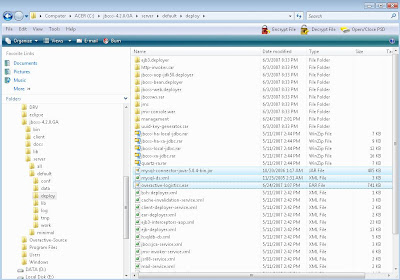
At the end the "deploy" folder in your JBoss installation should look like this:

9. Run Overactive Logistics
-Open your web browser and type the following link:
http://localhost:8080/logistics/
Note: Your web browser should have the Java Plug-in 1.4.0 or higher installed. This is normally done as part of the
"Java SE Development Kit 6" installation.
-Once the login screen shows up access the application using the following:
User : admin
Password: admin


